Tuesday, June 26, 2018

How to Layer Stain for a COOL Look!!Furniture Finishing Techniques, Distress, Antique

How to Layer Stain for a COOL Look!!Furniture Finishing Techniques, Distress, Antique

It's getting thick Its growing in thick Its looking sweet, aint it I cant think of nothing to say, NOTHING. Shootz brah Im acting like CeLo with my animal during an interview Hey buddy So whats up guys, I just wanted to give you a quick little tutorial on layering stain. Kind of like i did on the top of that wave desk, on the outside, where I had a couple different colors, sanded it just a little bit, and then layered it. It gave it a kind of cool look.
So I just wanted to give a tutorial because to go along with that desk the person wanted a little storage area to go up under the desk for the supplies and stuff like that.

So i just whipped up this little storage
unit Its just a box with a shelf and its got some wood slats in the back and its got some little castor wheels on the bottom so it can out from under the desk. It was a simple little project so I'm not going to waste your time showing you how to build this thing. I'm just going to show you how I finished it. So, to get started I went ahead and did the inside a solid color because I'm not worried about layering it on the inside.

There will be baskets in there so I'm not worried about that. As far as supplies, you don't really need that many, at the minimum you need two different colors of stain. I have that dark Kona and that sun-bleached that I will put on top. I have the Polycrylic to seal everything up.

You'll also need just a #220 girt sandpaper just to lightly sand it and then just a staining rag so you can rub in the stain. That's it as far as the supplies go. To get started I'm going to go ahead and put tat first layer on which is going to be the Kona, the dark brown. I'm just going to put in on, let it dry and then go from there.

I usually use a rag but you can use a sponge brush or you could just use a regular brush. The reason I like a rag is because I tend to have more control over the
the stain when I apply it. So, that's why I like using a rag. What I end up doing is I just cut down a t-shirt into a small square.

What I don't want is to have a big huge rag where I'm worrying about controlling the excess or anything like that. So I take a little rag and I what I do is wrap two fingers around, get it wet with stain, and then I can really control it just using the two fingers. So that's the method I tend to use. All right, so I just finished that first coat of Kona stain and even though I plan on putting a second coat just on the outside part i want to go ahead and lightly sand it
because even though I'm going to be covering it with more stain, this kind of starts the process of it having that cool layered look.

Where it has some darker spots and lighter spots. What will happen is I'll go ahead and lightly sand this. I'll actually sand away some of this first coat to where a lot of the bare wood underneath is exposed. So when I put that second coat on the places where it still has some of this dark stain, it will get darker, and then it will stain some of the places I sanded it will be a little lighter.

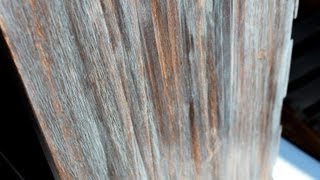
What it will do is start giving it that texture look. So, I'm going to lightly sand it real quick and then put another coat of this Kona stain on the outside. All right, I just finished up that second coat of Kona stain and I went ahead and lightly sanded it again. As you can see, what I was doing was just putting more pressure in certain areas than others and it was getting it down to the bare wood and it gave it a streaky look which is exactly what I was going for.

Now I'm done with that step and now I'm going to do the final color, sun-bleached, which is like a light grey color. On this color what I plan on doing is I'll just apply the stain and then as soon as I put it on just immediately just wipe it off. I don't want to much of it to stay on there but I do want a little bit of that color. So I just finished up the grey and as a last step i went ahead and went over all of it with a #220 grit, lightly, just blending the grey and what I ended up with is this streaky wood grain look.

I think it looks awesome! So I'm finished with everything on the outside and the only thing I left to do is to put a coat of protection on. I'm going to use Polycrylic on the outside, gloss. I really think gloss makes this effect really pop and look cool with the shine. So I'll put a gloss on the outside and just a satin on the inside.

I didn't really do anything to the inside so I want to keep the look subdued. So that's the last thing I need to do and then I'll be done. *Music* So, there you have it, that's layering stain and as you saw it's super easy even he could do it This dudes huge isnt he, I bet he weighs like thirty pounds. He's so fat He doesn't like being called fat what you mad now? Why you fat I called you fat? All right buddy see you later.

Why you so mad dude why you so mad goofy cat I guess I'll see you guys later. Later dude, later Later tater..

Monday, June 18, 2018

How to Get Rid Of Bed Bugs on Couches and Furniture

How to Get Rid Of Bed Bugs on Couches and Furniture

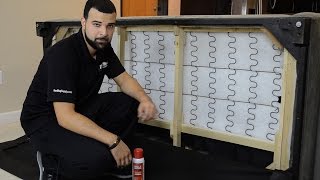
Hello this is Jose with Bedbugsupply.Com.
Today I am going to show you how to properly inspect and treat couches and other furniture
for bed bugs. These are proven, professional-strength treatment methods, and are all part of our
4-step do-it-yourself solution found on our website. Lets have a closer look. Every crevice and seam on your
sofa is a potential home for bed bugs to hide in When a host is on the couch, they emit
body heat and carbon dioxide that will draw bed bugs out of their hiding places in search
of their next meal.

You can inspect for bed bugs in your couch
using a Flashlight , a pair of nitrile gloves, a magnifying glass, and a Credit Card for
hard to reach areas What were looking for are signs of bed
bug activity. Black Spots are signs of bed bug waste. These look like thin black streaks,
and can be seen on sheets and upholstered furniture. Molted skins are signs of bed bugs
progressing through the five growth stages between hatching and reaching sexual maturity.
Finding these will let you know that bed bugs have been successfully feeding and maturing over time.

Dried up blood stains can be possible signs of recent feedings and are commonly
found on the fabrics of your bed or sofa. Bed Bug eggs are milky white and about half
the size of a grain of rice. These can usually be found in hidden cracks and crevices where
they won't be disturbed.  Bed Bugs themselves are oval and flat, unless theyve recently fed.

When they first hatch, theyre very small and hard to see; as they mature, they
grow dark and red, and will get to be about the size of an apple seed. You can begin your inspection by removing the layers
of cushioning from your couch, inspecting every item you remove. Since bed bugs are
good at squeezing into small spaces, its important that you leave no areas unchecked
or untreated. Trace every seam, edge, and zipper from end to end using your credit card
and flashlight.

There are tons of cracks and crevices under
the bottom of your couch; to reach those potential hiding places, you should remove the dust
cover, which is mainly there for aesthetics anyway. If you found any signs of bed bugs, youll
want to start treating your couch right away. Begin treating your couch by using a vacuum
to pickup as many bed bugs, bed bug feces, and eggs as possible along the cracks and
crevices of your sofa. Vacuuming for bed bugs is a great way to quickly
reduce the bed bug population before steaming and applying your residual chemicals.

While you could use your own vacuum, its
recommended to use a HEPA filtered PCO vacuum that features plugs and a shake-free bag to
prevent bed bugs from escaping the vacuums body. After youve finished vacuuming your sofa,
you can move on to the next step in the treatment process which is steaming the cracks and crevices
of your couch. Steaming is the most effective and environmentally friendly way of killing
bed bugs and their eggs on contact. All steamers that we carry are capable of producing steam
temperatures over 180 degrees fahrenheit, enough to kill bed bugs and their eggs on
contact.

To take full advantage of pin-point
nozzles, take a microfibre cloth and wrap it around the head of the accessory using
rubber bands to secure it. Using the cloth breaks up the pressure coming out of the steamer
and builds up the temperature at the tip of the accessory. You can steam your sofa by following all cracks
and crevices using your steamers pin-point nozzle attachment. You want to treat around
the armrest, below the cushions, and along every seam, to ensure you treat as many potential
hiding places as possible.

If your steamer features a steam adjustment dial, turn the
pressure down for flat surfaces and up to penetrate into cracks and folds. When finished, give your couch a few hours
to fully dry before applying your residual chemicals. You can also use a fan in the treated
area to circulate the air and speed up the drying process. After you steam clean your sofa, its important to treat your couch with an effective residual.

JT
Eaton Kills Bed Bugs Plus is a non-staining residual insecticide offering up to 12 weeks
of protection against the toughest of bed bugs and their eggs. Before using JT Eatons Plus, we recommend wearing a long sleeve shirt, and using a pair of chemical resistant gloves to prevent skin contact with the chemicals found inside. And remember, you should always refer to the products label, and msds, for safe and effective usage. Begin by attaching the
included straw applicator and spraying every seam, flap, crack, or crevice found on your
sofa.

Be sure to apply JT Eaton Plus to the zippers and seams of the cushions as well
to ensure no area is left untreated. After you treat your sofa with a residual,
you can prevent bed bugs from reaching you on your couch by using ClimbUp Insect Interceptors.
The Interceptors work by using you as a lure to bring out bed bugs from their hiding spaces
and towards the Interceptor. Bed bugs climb up the edge of the interceptor and fall into
a pitfall trap, which features a thin coat of talcum powder to prevent bed bugs from
climbing back out. To install ClimbUp Insect Interceptors on your couch, simply lift up
the leg post and place an interceptor underneath.

With the ClimbUps in place you can stop bed
bugs from being able to reach you, while also monitoring their population over time.  To increase the chances
of attracting bed bugs to your installed monitors, you can convert them to active monitors with the inclusion of SenSci Activ lures. SenSci Active is a new, easy-to-use bed bug lure that
slowly releases an odor that can attract bed bugs for around 2-3 months. If you followed and completed these steps,
you can rest assured your couch is now bed bug-free.

You can find our full selection
of vacuums, steamers, traps, sprays, and more here at Bedbugsupply.Com. If you have
any questions about our 4-step protocol or any of the products we carry, you can reach
us via live chat or call us toll-free at 866-238-9868. Again this is Jose with BedBugSupply.Com..

Sunday, June 10, 2018

How to Dry Brush FurnitureFurniture Painting Techniques

How to Dry Brush FurnitureFurniture Painting Techniques

Hi there, it's Rosanne here from Country Chic Paint. Today
I want to  introduce you to a fun painting technique called dry brushing, so stay tuned! So in this tutorial we'll be using some paper towel, a plate, a chip brush and two Country Chic Paint colors Dry brushing is a technique you can use to give your
piece a worn or a beachy kind of look So I'll show you how to do the dry brushing technique on this little table that we painted in the color Cobblestone.
I'm going to use two different colors Sunday Tea as well as Pebble Beach to dry brush
on top of this. What I like to do is pour a bit of paint on a paper plate and use
that to dab my brush in. If there's too much on your brush you can dab some of
it off on the plate or on a piece of paper towel.

One very important thing to
remember is that you need very little paint on your brush. It's called dry
brushing for a reason. As you can see the bristles are not soaked in paint. The
brush is almost dry, that is exactly what we want.

To dry brush this table I'm
going to use gentle, quick strokes going back and forth. Having a light hand is
key You want to have your brush only just
touch the surface of your piece Sometimes you'll accidentally put too
much paint on your brush and end up with a bit of a glob on your piece you can just
take a wet cloth and blended it in or remove it I really love this technique, it gives such a
gorgeous, worn look to your piece you know you can keep playing around with it
until you're happy with what it looks like In the next video I will show you how
to finish that table top of this piece with our Tough Coat so that it can stand up
to a lot of usage. If you enjoyed this video please leave us a comment or a like
below and on our website you'll find out more about our products. Our website is
countrychicpaint.Com.

Thank you so much for watching, and happy painting!.

Saturday, June 2, 2018

How To Create a Metallic Finish on FurnitureMetallic Furniture Faux FinishCountry Chic Paint

How To Create a Metallic Finish on FurnitureMetallic Furniture Faux FinishCountry Chic Paint

Hi there, it's Rosanne here from Country Chic Paint. You may have seen some fantastic project done with our metallic creams but
did you know that they can be used for more than just accents? If you're ready to
go bold with your next project, why not add some sparkle to the whole piece? In
this video I'm going to give this headboard a glamorous new look so stay tuned to see how it turns out! A few days ago I prepped this headboard and painted it with one coat of Rocky
Mountain in our All-in-One Decor Paint My next step will be to put some of our Trigger metallic cream on this paper plate. I'll be using this sponge to apply
the metallic cream which will create the smoothest finish. Having it on this plate
makes it easier getting the product on the sponge.

The metallic cream dries
rather quickly so on flat surfaces you want to apply it in long, even strokes for
the smoothest look. Around the spindles of the headboard I'll be pushing the sponge into the grooves to make sure I'm getting the metallic cream everywhere.
I'm going to let this coat dry for about an hour or two before going on to the next
step. Now that the Trigger metallic cream is completely dry I am going to be
using this large, short-handle paint brush to apply Silver Bullet metallic cream on
this piece Again, I'll put some of the metallic cream on a plate, then I'll apply it to my piece without
worrying about covering every single inch Next I'm going to take this lint-free rag to
wipe away the Silver Bullet metallic cream so that I'm just leaving a wash behind I'm simply trying to give the Trigger
metallic cream finish more depth by adding a second color This is just one of many techniques you can use with the metallic creams. I'd love to encourage you to play around with our
four different metallics and combine them together in layers to create unique
finishes.

They are very versatile products and will definitely give your
piece that one of a kind look. To find out more about our products and where you can buy them
click the website link on your screen now or in the description below this video. If you
liked this video please leave us a comment and click the Like button. If you'd like
to see all four of our metallic cream colors in action, click the link in description
below to watch our metallic cream tutorial.

Thank you so much for watching
and happy painting!.